Vanilla Buttercream Frosting!

HEY Y’ALL

PHEW it’s been a while! Life seems to get away from me these days, is anyone else FREAKED OUT that it’s already mid-July?!?!?! WHAT!? Where does the time go?! But anyway, I HAD to get another post up because I’ve been baking like CRAZY these days and for just about everything I made I used the same buttercream frosting that got really great reviews from the eaters of all the treats!

Over the past few weeks I’ve made birthday party cupcakes, a bridal shower cake, and some baby shower cupcakes (all pictured below.) The buttercream recipe I used is seriously SO easy, quick and delicious and only has 4 ingredients!

So here we go!

Ingredients

6 Cups Powdered Sugar

3 Sticks of Butter

3 Tbsp Heavy Whipping Cream

2-3 Tsp of Vanilla (to taste)

Step 1: Combine the powdered sugar and softened butter (this makes it easier to mix) until smooth

Step 2: Add the heavy whipping cream and mix until desired consistency

Step 3: Add the vanilla and mix again until all combined into the frosting

AND THAT’S IT! Seriously, how easy is that? A few things I learned from making it, DON’T add your vanilla until your butter and powdered sugar are combined. I added all the ingredients together at once and the vanilla make the powdered sugar clump up a little and it was hard to get all the clumps out! Another thing was this amount above is perfect for 24 cupcakes with a good amount of frosting on each. It was hard to determine what the right amount was and to avoid making an excessive amount of frosting I would just start small and make more if necessary, but if you’re going to color the frosting and want it to stay consistent this is the right amount for the typical 24 cupcakes!

So there ya go! It’s a short post today but that’s how quick it is to make this frosting! I hope you guys try it out and love it as much as I do! Thanks for reading!

xoxo,

Kristin


Chocolate Oreo Cupcakes with Cream Cheese Frosting!

HEY Y’ALL!

I’m back with some baking treats for you before this lovely Thanksgiving weekend! Now, they’re not Thanksgiving themed and don’t include any pumpkin flavored ingredients BUT my awesome manager at work is going on maternity leave in December so our team threw her a little baby shower lunch and she said the only thing she wanted was for me to make cupcakes! She knows my love of baking and my aspirations for owning a bakery someday and she’s been trying to get me to bring in some treats for months!

So after much searching and trying to find something cute to make that was baby-themed or baby-boy-themed but also easy to transport and not too messy I settled on chocolate Oreo cupcakes with blue and white swirled cream cheese frosting! With a little mini Oreo to top it off! SO let’s get this party startedddddd!

You’ll need:

For the cake – 

FullSizeRender (32)

You’re favorite chocolate cake mix (homemade or from a box)

1 package of regular Oreos (or mini Oreos; I went mini because, BABY; and I only needed one package, not two!)


For the frosting – 

FullSizeRender (33)

2 packages of 8oz cream cheese

2 sticks of butter (salted or unsalted)

2 C Powdered sugar

2 tsp Vanilla extract


Cake

Step 1: Preheat your oven to the given temperature

Step 2: Prepare chocolate cake mix as on the box or per your favorite recipe

Step 3: Crush the Oreos with either a food processor or in a Ziploc bag until you get about 1 1/2 C of crushed cookies and mix them in with the cake batter

Step 4: BAKE! As instructed


Frosting

While your cake is baking you can get started on the frosting or make the frosting first and stick it in the fridge! Just be sure to take it out about 10 minutes before you go to decorate!

*To swirl the icing, prepare as follows. If you want your frosting one color you don’t have to separate the ingredients*

Step 1: Using a hand mixer/standing mixer (or if you’re me and forgot you don’t have a mixer at your new house, a potato masher…….lol) mix 1 package of cream cheese until smooth

Step 2: Add in the butter in small chunks until all butter is added and mixture is smooth

Step 3: Add 1 C of sifted powdered sugar and 1 tsp of Vanilla extract and mix until most of the chunks are gone; don’t mix too much because you will be adding color and will mix more!

Step 4: Add in food coloring until you reach your desired color and mix until smooth

*TIPS: 

  • DON’T over-mix or the frosting won’t be as stiff (if you’re looking to pipe), that’s why I recommend not mixing until smooth before you put the food coloring in
  • A little more powdered sugar is ok if you want it a little sweeter (I wouldn’t do more than an extra 1/4 C) but too much powdered sugar will also make it a little more drippy and not as stiff (again, if you’re looking to pipe)
  • If you want your frosting to be white, choose a butter that is closer to white in color, yellow butter will make it look a little off-white

The picture below is about the consistency you want to reach, maybe even a little tiny bit smoother

IMG_1024

Repeat Steps 1-4 with the remaining ingredients for your second color! If you want white, stop at Step 3 and just make sure your mixture is smooth and lump-free!


NOW FOR THE FUN PART!

To make swirled frosting, load your piping bag with one color on one side of the bag, and the other color on the other side like the picture below

IMG_1030.JPG

The frosting won’t fall all the way into the tip so squeeze gently onto a paper towel until you get the color combination you want! For me, I put the white color in first so the white came out before the blue so I just squeezed the white frosting back into the bowl.

To get the swirled look I frosted from the inside out. Start at the very center of the cupcake and swirl to the edges. Once you’ve made a complete circle, without stopping begin to take the icing up! If it’s easier to visualize I found a picture tutorial here!

The icing will get a little softer as you go on since your hands will warm it up but I had no problems with it staying up! I also had at least 2 cupcakes-worth of frosting left over so feel free to be a little generous with your frosting!

The final touch was adding a little mini Oreo to top it off but feel free to add some crushed Oreos too!

FullSizeRender (34)

The cupcakes went over really well for the baby shower lunch and I had a blast making them! If I had more time I would have made a homemade chocolate cake recipe but I digress! Thanks for reading, lovers! It’s good to get back to baking!

xoxo,

Kristin

Easter Cheesecakes!

HEY Y’ALL!

Happy (late) Easter! Hope you all had a great weekend and the Easter bunny brought you lots of yummy treats 😉 #chocolateoverload!

Saturday my momma and I spent most of the day in the kitchen making lots of goodies and food for Easter Sunday! She found a recipe a few weeks ago for little cheesecake bites she wanted me to make that looked like a little nest with speckled chocolate eggs in it so OBVIOUSLY I obliged! hahaha I LOVE CHEESECAKE! So Saturday morning and into the afternoon I made these cute homemade cheesecakes and they were a hit! So I’m going to show you how I made them, and since Easter is over give you some other tips on what you can top them with to make them all throughout the year! (Or just come back and visit next Easter and make them then! 😉 )

You’ll Need:

1 Cup of Graham Crackers

3/4 cup + 2 Tbsp Sugar

1 Tsp Vanilla Extract

3 Tbsp Butter

3 Eggs

3 packages of 8oz Cream Cheese

(and coconut and M&Ms for the Easter version)


Before you get started, preheat your oven to 325 and line 18 cupcake tinsFullSizeRender (23)

For the Crusts

Step 1: In a food processor or a large Ziploc bag, crush one cup of graham crackers

Step 2: In a medium sized bowl, mix your 1 cup of graham crackers, 3 Tbsp of butter, and 2 Tbsp of sugar

Step 3: Press the mixture into the bottom of your 18 cupcake tins

*I FORGOT TO TAKE A PIC OF THIS STEP! BUT I used a heaping spoonful to spoon in the crust mix and pressed it down with my fingers*


For the Filling

Step 1: In a large mixing bowl, mix 3 packages of cream cheese, 3/4 cup sugar, and 1 Tsp vanilla extract until smooth

Step 2: Add each of your 3 eggs one at a time into the mixture using the lowest setting on your mixer

Step 3: Once smooth, place a large spoonful in each cupcake tin

Step 4: Bake for 25-30 minutes! You’ll be able to tell if they’re done by jiggling the pan; if they jiggle pop them back in for a bit!

(Here’s how full mine were! Very close to the top, unlike a cupcake or muffin!)

FullSizeRender (24)


Once they come out of the oven, let them cool down completely! Right when you pull them out they’ll be a little puffy and mine even had some cracks in them but when they’re completely cool they’ll go down a bit and the cracks will have sort of molded back together! Mine kind of sunk in at the middle if you can see in the pic below! After they’re all cool refrigerate them for at least 2 hours! I left mine in overnight and took them out a few hours before serving but if you’re serving that day make sure you give them at least 2 hours!

FullSizeRender (25)


FullSizeRender (26)

For the Topping

The recipe calls for toasted coconut to make it look like a little nest on top so to do that, lay out as much coconut as you’d like and bake it for ten minutes at 350!

Once it’s done and all cool, top your cheesecakes with a little coconut and a few speckled M&Ms for a cute, sweet, Easter treat!

FullSizeRender (27) FullSizeRender (28)


So those are the cute little bird’s nest Easter cheesecakes, but since Easter is now over I thought I’d give you guys a few extra ideas for the summer time coming up or any time throughout the rest of the year you feel like making them!

  • Some cherry pie filling from the grocery store on top would make for a perfect cherry cheesecake bite!
  • Cut up some strawberries, put a little sugar on them and leave them in the fridge overnight, then top off the cheesecakes with those yummy strawberries and syrup that they made for a nice summertime treat!
  • OR put a little whip cream and fresh blueberries on top for an awesome springtime dessert!

I hope you guys liked this recipe! It was a little time consuming but well worth it for the super rich and yummy cheesecake!

xoxo,

Kristin

Reese’s Peanut Butter Cupcakes!

HEY Y’ALL

Happy Monday! (Ick, right?) I hope you’re all recovering nicely from all the yummy (but terrible) food and inevitable beers you consumed last night during the BIG GAME! As a Redskins fan (insert 23 years since their last Superbowl joke here) I didn’t really care who came out on top but I was all about the snacks! It’s one of those days you can feel guilt-free about eating your body weight in all things covered in cheese, what’s not to love?!

But besides the Superbowl this weekend, I got to hang out and enjoy some MUCH needed girl time with my BFF bride-to-be and her bridesmaids and I decided to make some sweet treats for our girl’s night! (Is there anything better than hanging out with friends, drinking wine, eating cupcakes, and painting your nails?!) So here’s the recipe for some Reese’s Peanut Butter Cupcakes that a wonderful friend gave to me in college! And maybe making these will help you get out of that Monday funk!

You’ll Need

1 box of white cake mix

1 can of white frosting

24 Reese’s peanut butter cups

Creamy peanut butterFullSizeRender (1)

(and any ingredients on the box of mix, typically water, veggie oil and eggs)


For the Cupcakes

Step 1: Preheat the oven according to the cupcake instructions on the box of mix and cover your cupcake pans with cupcake liners

Step 2: Mix the cake mix according to the instructions on the box

Step 3: Cover the bottom of each cupcake liner with batter

Step 4: Place a peanut butter cup in the bottom of each cupcake liner

Step 5: Completely cover the rest of the peanut butter cup with batter

IMG_0017 IMG_0018 IMG_0019

I had a lot more batter left over than I thought I would when I was making these so the cupcakes ended up being filled about 3/4 of the way full instead of the usual 2/3 full like they would be for any other cupcake recipe.

FullSizeRender (2)

But now you’re ready to throw those babies in the oven!! Bake them for however many minutes it says on the box (around 20 mins) and while they’re baking, we can get started on the frosting! YAY!

*TIP: If your oven isn’t big enough to fit two pans on the top rack, put them on two different racks and switch the pans halfway through baking!*


For the Frosting:

Step 1: Empty the entire can of frosting into a mixing bowl

Step 2: Add in two GENEROUS scoops of your creamy peanut butter

Step 3: Stir like CRAZY!

(The frosting should be the color of cookie dough! But feel free to add extra peanut butter if you like a little more!)

Once your cupcakes have finished baking and cooled to room temperature (IMPORTANT: Hot cupcakes will just make your frosting run right off the cupcake! That’s the number one thing I see on Pinterest fails lol) you’re ready to frost them! If you just want to use an icing knife you can definitely do that, do what you’re comfortable with! But if you want to make them a little more fancy and fun, you can certainly do that too and I’ll help you! I’m using ALL things that you can buy at the grocery store or a Walmart!

I start by using Wilton Decorating bags that I found at Safeway and a decorating tip from any of those colored icing tubes that you use to write on a cake! We’ve used them so many times and they always come with extra tips so we have a TON IMG_0029 (1)
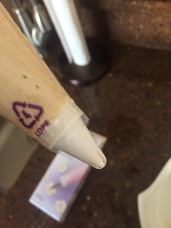
left over at our house. If you’ve never used any of them IMG_0028and don’t have any frosting tips I think you can also by some at the grocery store! Once I find the tip that I like (for these I used a flower tip) I gradually cut the end of the decorating bag (I cut a very small amount off at a time so I don’t cut off TOO much) until the tip fits in nice and snug! You’re going to be putting a lot of pressure on it when you squeeze out the frosting so you don’t want the tip flying out of the bag! Then I fill up the bag about 2/3 the way full and twist the end. DON’T overfill the bag or it will start coming out of the top and make a HUGE mess!

Now you’re ready to frost! I did a really simple technique that I learned at my cupcake class. You start by beginning to put your frosting on at the outer edge of the cupcake:

 IMG_0033

Then start going around the perimeter of the cupcake (the slower you do it, the better it will look, I rushed mine a little)

IMG_0034

Keep going around the cupcake as many times as it takes to cover it with the frosting!

IMG_0035

Top it off by squeezing a little extra to really make the flower design stand out and TA-DA! You just frosted your cupcake like a CHAMP! I’m so proud of you, you’re the bomb!

IMG_0036

And once you’ve frosted them all, pat yourself on the back and eat a cupcake or two because YOU DESERVE IT! Look at those delicious little treats you just made!

IMG_0037 IMG_0030 FullSizeRender (4)

I hope you guys enjoyed this little how-to for some yummy cupcakes and get to make them sometime soon! The icing on my cupcakes came out a little different on each of them by going slower or faster and sometimes moving my hand in little up and down motions as I went around the cupcakes so add a little flare to your cupcakes if you want! This recipe is so easy and can definitely be tweaked however you want! I’m even thinking of trying chocolate cake and frosting next time! So go treat yourself to a cupcake and have an awesome Monday and a great week! 🙂

xoxo,

Kristin